Security with SSH Tunneling
Connection to Notebook over SSH tunneling (secure)
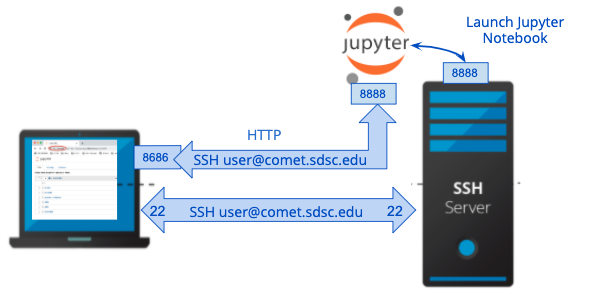 connection over HTTP
This section shows you how to launch a Jupyter Notebook using an interactive node or on a compute node, and to use ssh tunneling to securely connect to the notebook server.
Interactive Node Method
Open two terminals on your computer
We will use one terminal to start the notebook, and the other to establish the tunnel. Pick the first terminal, call it T1.
SSH into comet from your local computer:
In T1, ssh user@comet.sdsc.edu. This is just a regular SSH login.
Claim an interactive node
In T1, srun --partition=debug --pty --nodes=1 --ntasks-per-node=24 -t 00:30:00 --wait=0 --export=ALL /bin/bash
Feel free to adjust the parameters, but remember that in the debug partition you can only claim a node for up to 30 minutes. You can use other queues, but you may have to wait longer. Take note of the <node name> of the interactive node.
Start a jupyter notebook server on the interactive node.
In T1, run the command
jupyter notebook --no-browser
The no browser option is required, otherwise the program may think you want a text representation of your outputs in the terminal, which trust me - you don’t want. You can also specify a port number if you wish using the --port 1234 option. Note the value of the <jupyter port> number returned by the command.
Create SSH Tunnel Connection
In the next command, you will create an ssh connection between your local host and the notebook port on the remote, interactive node. When you connect your browser to the notebook service, this will channel all communications via the SSH connection, which is secure and encrypted. In the second terminal, call it T2, run the command
ssh -L 8888:127.0.0.1:<jupyter port> user@comet-14-01.sdsc.edu
Replace comet-14-01 with the name of the compute node. You can view the compute node in T1 prompt. Replace the <jupyter port> with the port the jupyter notebook started on after running the jupyter notebook --no-browser command in window T1. The default jupyter port number is 8888, but don’t worry if its different.
This establishes a tunnel between port 8888 on your computer and the jupyter port on the compute node
Visit the port in your local browser
In any browser, type in 127.0.0.1:8888 and you should get your notebook. You’ll have to input the jupyter token available in your terminal.
If for some reason that address doesn’t work, check the output of the terminal. You could try using the address localhost:8888 or 0.0.0.0:8888. The reason tunneling is generally not the prefered method is because it is complicated and the port numbers sometimes are not available by the time you access the service. And, you can’t know the port the jupyter notebook is going end up open on until you start it on the node, and you need to tunnel through that port… which is why we need two terminals in this example.
Compute Node Method
In this example, we use a batch script to obtain a compute node, and to launch a jupyter lab or notebook. You can access the jupyter service directly from your browser once it has started running on the comet node. This method uses the SSH Tunneling method described above to make a secure SSH connection between your laptop and the Jupyter services.
First, log onto comet using SSH.
Copy the batch script example
#!/usr/bin/env bash
#SBATCH --job-name=tensorflow-compute
#SBATCH --partition=compute
#SBATCH --time=00:30:00
#SBATCH --nodes=1
#SBATCH --ntasks-per-node=24
#SBATCH --output=tensorflow-compute.o%j.%N
module purge
module list
printenv
time -p singularity exec /share/apps/compute/singularity/images/tensorflow/tensorflow-cpu.simg jupyter lab --no-browser --ip="$(hostname)"
This example uses the tensorflow singularity container available on comet. You can use any container you want. If you check out /share/apps/computer/singularity you can find many useful containers. The key part of this example is how the jupyter lab is started at the end - jupyter lab --no-browser --ip "${hostname}".
Submit this script to the queue
Simply run sbatch run-jupyter-tensorflow-compute.sh
One thing you may want to do is change the script to be --partition=debug if you want a shorter wait time.
Access the node in your browser
First, wait for the job to be submitted to the queue. Then, monitor the output file created by your batch job, which looks something like tensorflow-compute.o%j.%N if you used the example. Inside this file, you will see the output of the jupyterlab command. There, you should be able to see the port the jupyterlab server is running on, as well as the token you will need to login. My recommendation would be to just memorize the port number and copy the jupyter token. The port is almost always 8888 so it shouldn’t be that hard to remember. You will also need to know the comet node you are logged in on. You can view this by typing this command: squeue -u $USER. Under the NODELIST section you can see the comet node.
Open up a new tab in your browser, and type in the following: http://comet-xx-xx.sdsc.edu:PPPP where comet-xx-xx is the comet node, PPPP is the port number (usually 8888). The jupyter notebook page should show up, and you can now paste in the token from the output file.
Use your jupyterlab/jupyter notebook server!
Enjoy. Note that your notebook connection is secured and encrypted.